1. Introduction
The "Export" function allows users to save scientific data or images to files.
2. Export dialog
The Export dialog can be accessed via the Reconstruction menu, by choosing the Export… item. It is used to configure what aspects of the data you want export, what time range you want to export over, and the file names and formats you want to use.
The Export process can work in two different modes: Exporting a Time Sequence of snapshots, or just exporting a Single Snapshot of data.
The controls are divided into three groups. Range (or Time for a single snapshot), Options, and Export.
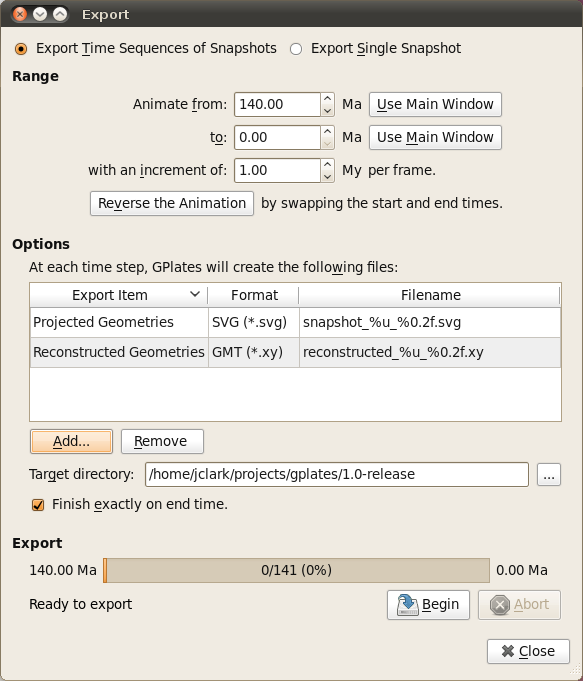
2.1. Export Time Sequence of Snapshots
Given a time range, export a series of files. Each file contains data at a particular time point. To activate the controls for exporting a time sequence, choose the Export Time Sequences of Snapshots option at the top of the dialog.
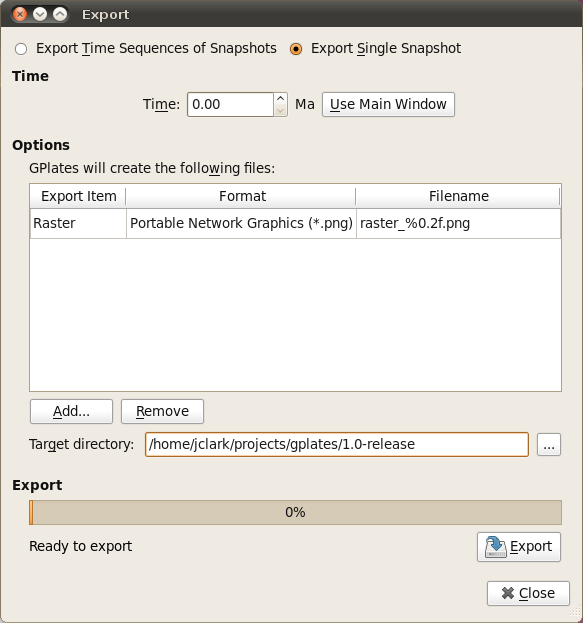
2.2. Export single Snapshot
Export data or image at a single specific time. To activate the controls for a one-off snapshot, click the Export Single Snapshot option at the top of the dialog.
2.3. Range
When using Export Time Sequence of Snapshots, the Range group of controls specifies the time range that the Export will cover. For convenience, these controls are linked to the Animation system, and affect the same time range that you see with the Time Slider and Configure Animation dialog - this way you can see a preview of what will be exported.
The Use Main Window buttons are a convenient way of quickly entering the time that the main window is currently viewing. The Reverse the Animation button can swap the start and end time.
2.4. Time
The Time group is used with Export Single Snapshot to specify a time point.
2.5. Options
The Option group specifies the items which users want to export and the directory to store output files.
A table shows what files will be created at each time, along with the substitution pattern that will be used to create each unique file name. Users can use Add… and *Remove" buttons to edit the table.
The Target directory specifies which directory all the files will be created in. Users can use the button on the right to select directory.
|
|
The Finish exactly on end time checkbox is important if you are creating an animation with a time increment that is not an exact multiple of the range of your animation. For example, creating an animation between 18 Ma and 0 Ma, in increments of 5 M. This range leaves a 3 million year gap at the end which does not fit neatly into the supplied 18-0 range. Checking the Finish exactly on end time option ensures that GPlates will still write this final, shorter, frame. |
2.6. Export
The Export group is used to start and stop the export, and provide progress information during the export process. Click Begin to commence the export and begin creating files. If you have specified a large range, this may take some time.
The Abort button is provided in the event that users wishes to terminate the export sequence early. In Export single Snapshot mode, users can not abort.
3. "Add Export" dialog
When choosing the "Add" button to add a new export item to the table, the Add Export dialog is shown to allow the selection of export type, format, and filename.
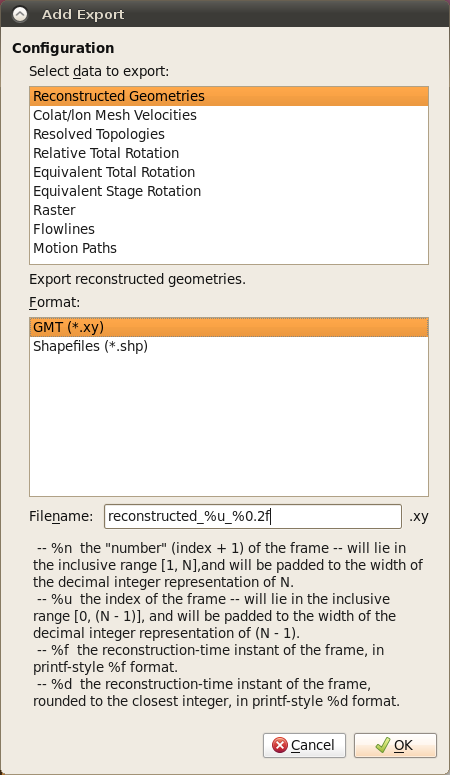
3.1. Select data to export
Users can select an entry in this list, and then the available output format will be listed in Format list.
3.2. Format
Select output file format in this list.
3.3. File name template
Specify the file name template which will be used to generate output file names.
4. Export Items
Below is a table of available export items.
| Item | Format | Description |
|---|---|---|
Reconstructed Geometries |
GMT, Shapefile |
Export the reconstructed geometries in their paleo-coordinates. |
Projected Geometries |
SVG |
Export projected geometries data according to the current View settings. |
Colat/lon Mesh Velocities |
gpml |
Export Plate velocity data. You will need to have plate topologies and a mesh cap configured. |
Resolved Topologies |
GMT |
Export resolved topologies as static polygons in paleo-coordinates. |
Relative Total Rotation |
CSV |
Export relative total rotation data. |
Equivalent Total Rotation |
CSV |
Export equivalent total rotation data. |
Equivalent Stage Rotation |
CSV |
Export equivalent stage(1My) rotation data. |
Raster |
bmp,jpg,jpeg,png,ppm,tiff,xbm,xpm |
Export an image according to the current View settings. |
Flowlines |
GMT, Shapefiles |
Export flowlines. |
Motion Paths |
GMT, Shapefiles |
Export motion tracks. |
5. File name template
The Filename field is used as a template value that GPlates will use to name your exported files, and ensure that each Export snapshot gets assigned a unique name. Special Placeholder tokens can be used in this text entry box that GPlates will substitute for different values according to what is being exported and at what time.
| Placeholder | Description |
|---|---|
%n |
the "number" (index + 1) of the frame — will lie in the inclusive range [1, N], and will be padded to the width of the decimal integer representation of N. |
%u |
the index of the frame — will lie in the inclusive range [0, (N - 1)], and will be padded to the width of the decimal integer representation of (N - 1). |
%f |
the reconstruction-time instant of the frame, in printf-style %f format. |
%d |
the reconstruction-time instant of the frame, rounded to the closest integer, in printf-style %d format. |
%P |
placeholder string will get replaced for each type of export. |
![]()
![]()
![]()